Getting Started with Profit Tracking
This guide will walk you through setting up the Profit Tracking system. This powerful tool allows you to go beyond simple revenue tracking and understand your e-commerce store's true profitability by calculating the Cost of Goods Sold (COGS) for each transaction.
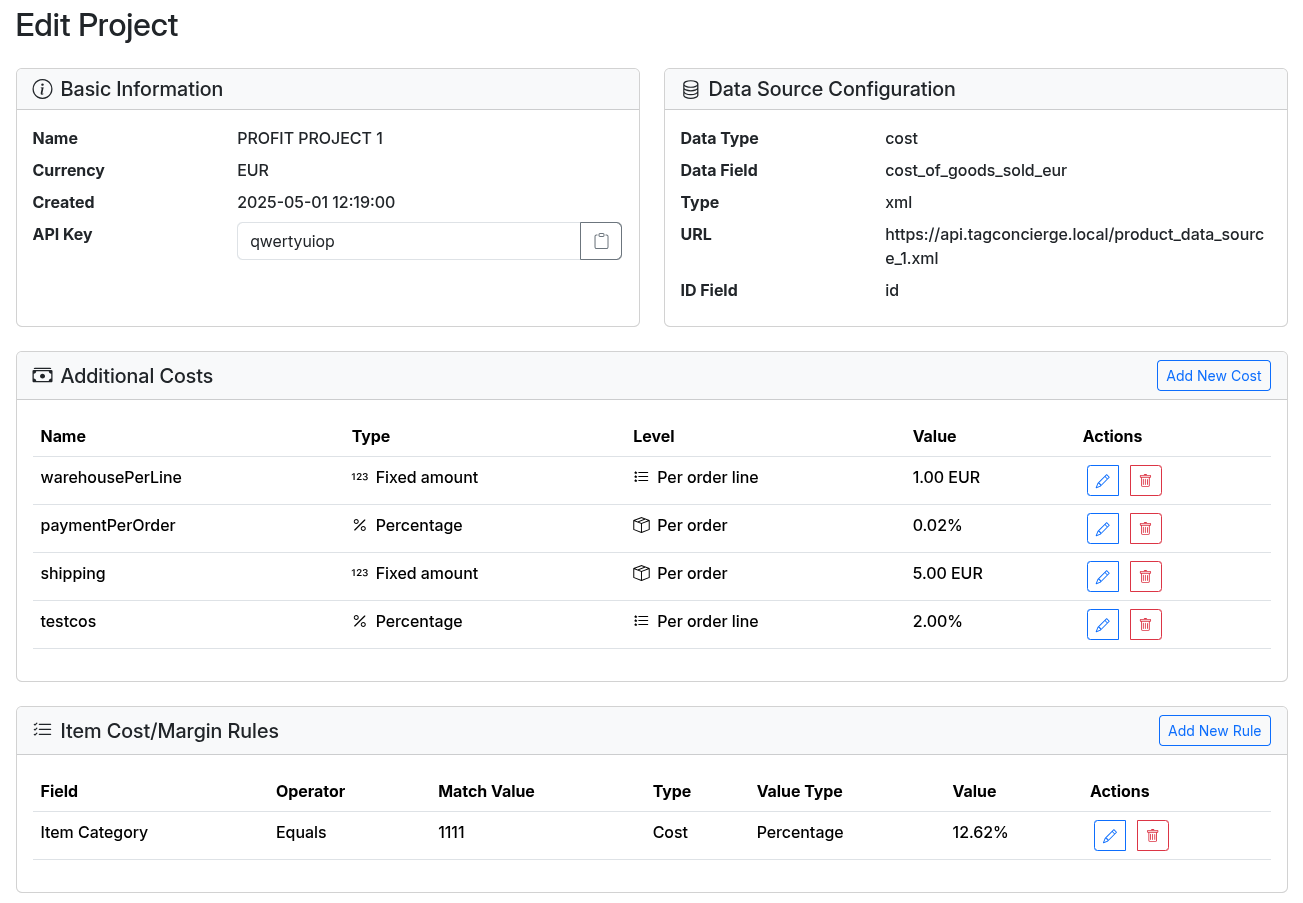
Profit Tracking can be configured to calculate profit based on a set margin or by pulling cost data directly from your product feed. You can also configure fixed costs per order or per order line.
The setup process involves two main parts:
- Configuring a Profit Project in your customer panel.
- Setting up a tag in your server-side Google Tag Manager (sGTM) container to process the purchase data.
1. Configuring the Profit Project
A Profit Project is where you define all the rules and settings for calculating profitability.
Key Configuration Options:
- Currency: The default currency for your project.
- Data Source: You can connect a product feed (CSV or XML, compatible with Google Merchant Center format) to pull
costormargindata for each product. - Cost per Order: A fixed cost applied to every order. This is useful for costs like payment processing fees or standard shipping charges.
- Cost per Order Line: A fixed cost applied to each unique item in an order. This can be used for expenses like warehouse picking fees or item-specific packaging.
- Item Cost/Margin Rules: Define conditional rules to apply a specific cost or margin if a product attribute (like
Item Category) matches a certain value. This is particularly useful for products that are not found in your product feed, allowing you to set fallback profit calculations.
These settings can be accessed and modified from your dashboard. The screenshot below shows an overview of the configuration panel.
2. Setting up the sGTM Tag
The second step is to configure your server-side GTM container to send purchase events to the Profit Tracking endpoint. Our service will then process the data, calculate the profit, and return a modified event.
![]()
The endpoint for this integrationreceives the payload for processing. You will need to provide your unique API key in the Secret field for authentication.
For detailed instructions on configuring the sGTM tag, please refer to our technical guide on data flow.
By following these steps, you will have a fully functional profit tracking system that provides deep insights into your business's financial performance.